A Guide to Configuring Private Paths and Lifecycle Rules with AWS CDK and Go Lambda
Introduction
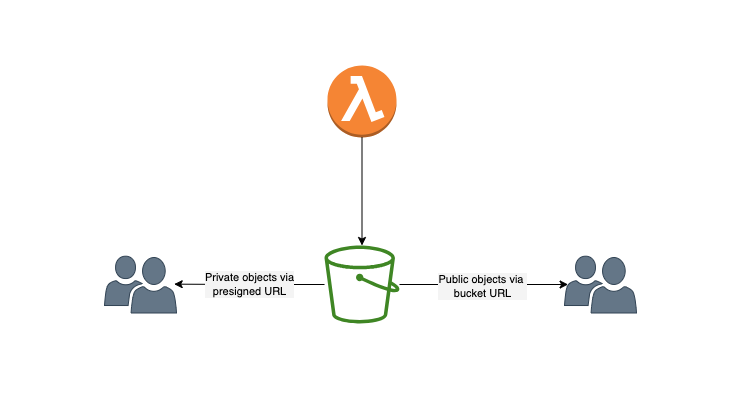
Recently I had a scenario where on user input I had to generate large report and then begin downloading it. Implying the requirements, the reports were no longer relevant once downloaded. Also, they were not supposed to be publicly accessible.
The use case of storing private files in public bucket might seem strange but could be a valid use case given you already have a domain suited public bucket and, you don’t want to add another bucket just for private files.
Pre-requisites
- AWS CDK framework installed and configured with appropriate AWS access and secret key.
- Basic understanding of Go for lambda logic.
- Basic understanding of AWS S3 and Lambda.
Solution
The solution was to use AWS S3 to store the reports, limit the access using S3 bucket policy and use pre-signed URLs with defined expiration to access the reports.

Implementation
Step 1. Setup the CDK project
In your command shell navigate to the directory where you want to create the project. Then run the below command. This will create a new CDK project configured in typescript with a sample stack in your current directory.
Note - the CDK project name would automatically configure to the directory name you are in.
  # Create a new directory and navigate to it
  mkdir aws-s3-file-downloader && cd aws-s3-file-downloader

  # Create a new CDK project
  cdk init app --language=typescript
Step 2. Setup S3 bucket
In the lib/aws-s3-file-downloader-stack.ts file, we will define our S3 bucket. We explicitly disable block access to
the bucket since the default value is set to enabled and that would override the bucket policy we plan to add in the
next step.
    const bucketName = "s3-private-content-bucket";
    const bucket = new Bucket(
        this,
        bucketName,
        {
            bucketName: bucketName,
            versioned: false,
            // explicitly enable public access to the bucket
            blockPublicAccess: {
                blockPublicAcls: false,
                blockPublicPolicy: false,
                ignorePublicAcls: false,
                restrictPublicBuckets: false,
            },
        }
    );
Next, we need to configure an auto-cleanup rule to auto delete files from the bucket after a certain period of time. In this example we are going to configure the rule to delete the files after 1 day. More about S3 lifecycle rules. Therefore, the above code after updates becomes
       const bucketName = "s3-private-content-bucket";
        const bucket = new Bucket(
            this,
            bucketName,
            {
                bucketName: bucketName,
                versioned: false,
                blockPublicAccess: {
                    blockPublicAcls: false,
                    blockPublicPolicy: false,
                    ignorePublicAcls: false,
                    restrictPublicBuckets: false,
                },
                removalPolicy: RemovalPolicy.DESTROY,
                lifecycleRules: [{
                    expiration: Duration.days(1),
                    enabled: true,
                    // prefix to delete files from
                    prefix: "private/"
                }]
            }
        );
Next, we need to configure our S3 bucket to allow public access to all objects except the ones under private directory.
    bucket.addToResourcePolicy(new aws_iam.PolicyStatement({
        effect: Effect.ALLOW,
        principals: [new aws_iam.AnyPrincipal()],
        actions: ["s3:GetObject"],
        notResources: [ bucket.bucketArn.toString() + "/private/*"  ]
    }));
Step 3. Setup lambda
First, we need to create our Go program that would run on AWS Lambda infrastructure to generate the create and write a sample file to S3 and configure its headers to begin a download.
Before we do that, we need to refactor our CDK project file structure to make space for our Go program. So, we create three new directories
- deploy - where all our IaaC will rest, basically the CDK project root
- bin - where our Go program binary will rest
- cmd - where our Go program source code will rest
  mkdir deploy
  # move all the CDK files under deploy, ignore the warning
  mv * deploy
  # create remaining two directories
  mkdir bin cmd
Next, we need to initialise our Go module. The below will setup Go modules for the current project with the provided project name.
go mod init aws-s3-file-downloader
Now we need to create a new Go program in the cmd directory. So add a new ./cmd/main.go file. And add the below code to it.
package main

import (
	"bytes"
	"context"
	"fmt"

	"github.com/aws/aws-lambda-go/lambda"
	"github.com/aws/aws-sdk-go/aws"
	"github.com/aws/aws-sdk-go/aws/session"
	"github.com/aws/aws-sdk-go/service/s3"

	"os"
	"time"
)

const EnvKeyBucketName = "BUCKET_NAME"

var s3Client *s3.S3
var bucketName string

func init() {
	bucketName = os.Getenv(EnvKeyBucketName)
	sess, err := session.NewSession(&aws.Config{})
	if err != nil {
		panic(err)
	}

	s3Client = s3.New(sess, &aws.Config{})
}

func main() {
	lambda.Start(handler)
}

func handler(ctx context.Context, content string) (string, error) {
	// Create a file in S3
	fileKey := fmt.Sprintf("/private/sample-%d.txt", time.Now().Unix())
	fileInput := s3.PutObjectInput{
		Body:               bytes.NewReader([]byte(content)),
		Key:                aws.String(fileKey),
		Bucket:             aws.String(bucketName),
		ContentDisposition: aws.String(fmt.Sprintf(`attachment; filename=%q`, "sample.txt")),
		ContentType:        aws.String("text/plain"),
		ContentLength:      aws.Int64(int64(len(content))),
	}

	_, filePutErr := s3Client.PutObjectWithContext(ctx, &fileInput)
	if filePutErr != nil {
		return "", filePutErr
	}

	// Generate pre-signed URL
	req, _ := s3Client.GetObjectRequest(&s3.GetObjectInput{
		Bucket: aws.String(bucketName),
		Key:    aws.String(fileKey),
	})

	// Set the expiration time of the URL
	duration := time.Minute * 1
	urlStr, err := req.Presign(duration)

	if err != nil {
		return "", fmt.Errorf(
			"failed to generate pre-signed URL for bucket: %s and key: %s, %s",
			bucketName,
			fileKey,
			err.Error())
	}

	return urlStr, nil
}
Since we need to include the dependencies part of our Go program, we run the below. This will create go.mod and
go.sum files in the root of your project and will download the required dependencies.
go mod tidy
Next, we need to build our Go program and generate the binary under a newly created directory bin. Before, we do that
we will install make to simplify the build process. You can download it
here. Then we define our make instruction in the Makefile.
# To force rebuild on these kind since we also have a directory by the same name as that of make alias
.PHONY: deploy

# Build and package our Go program
build:
	env CGO_ENABLED=0 GOOS=linux go build -ldflags="-s -w" -o bin/bootstrap cmd/main.go
	zip bin/uploader.zip bin/bootstrap

# Alias to bootstrap our CDK project
bootstrap:
	cd deploy && cdk bootstrap

# Alias to deploy our CDK project
deploy:
	cd deploy && cdk deploy --require-approval never

# Alias to destroy our CDK project
destroy:
	cd deploy && cdk destroy --require-approval never
and then run
make build
that should have the binary generated under bin directory.
Now we configure our CDK project to include our Go program in the deployment package of our AWS Lambda. We do that by
adding the below code to the lib/aws-s3-file-downloader-stack.ts file.
    // Configure Lambda
    const lambdaName = `file-url-generator`;
    const handler = new Function(this, lambdaName, {
        runtime: Runtime.PROVIDED_AL2,
        code: Code.fromAsset(path.join(__dirname, "..", "..", "bin")),
        handler: "bootstrap",
        functionName: lambdaName,
        environment: {
            "BUCKET_NAME" : bucketName,
        },
        memorySize: 128,
        timeout: Duration.minutes(15),
    });

    // Configure Lambda role inline permission to access the S3 bucket
    bucket.grantReadWrite(handler)
Note - we also grant read/write access to our lambda on our S3 bucket created in step 2.
Step 4. Bootstrap, deploy and test the project
We are now ready to deploy our project, before we do that we need to bootstrap our project. This is a one-time process.
To do this run make boostrap from the root of your project. Now finally, the project is really ready to be deployed.
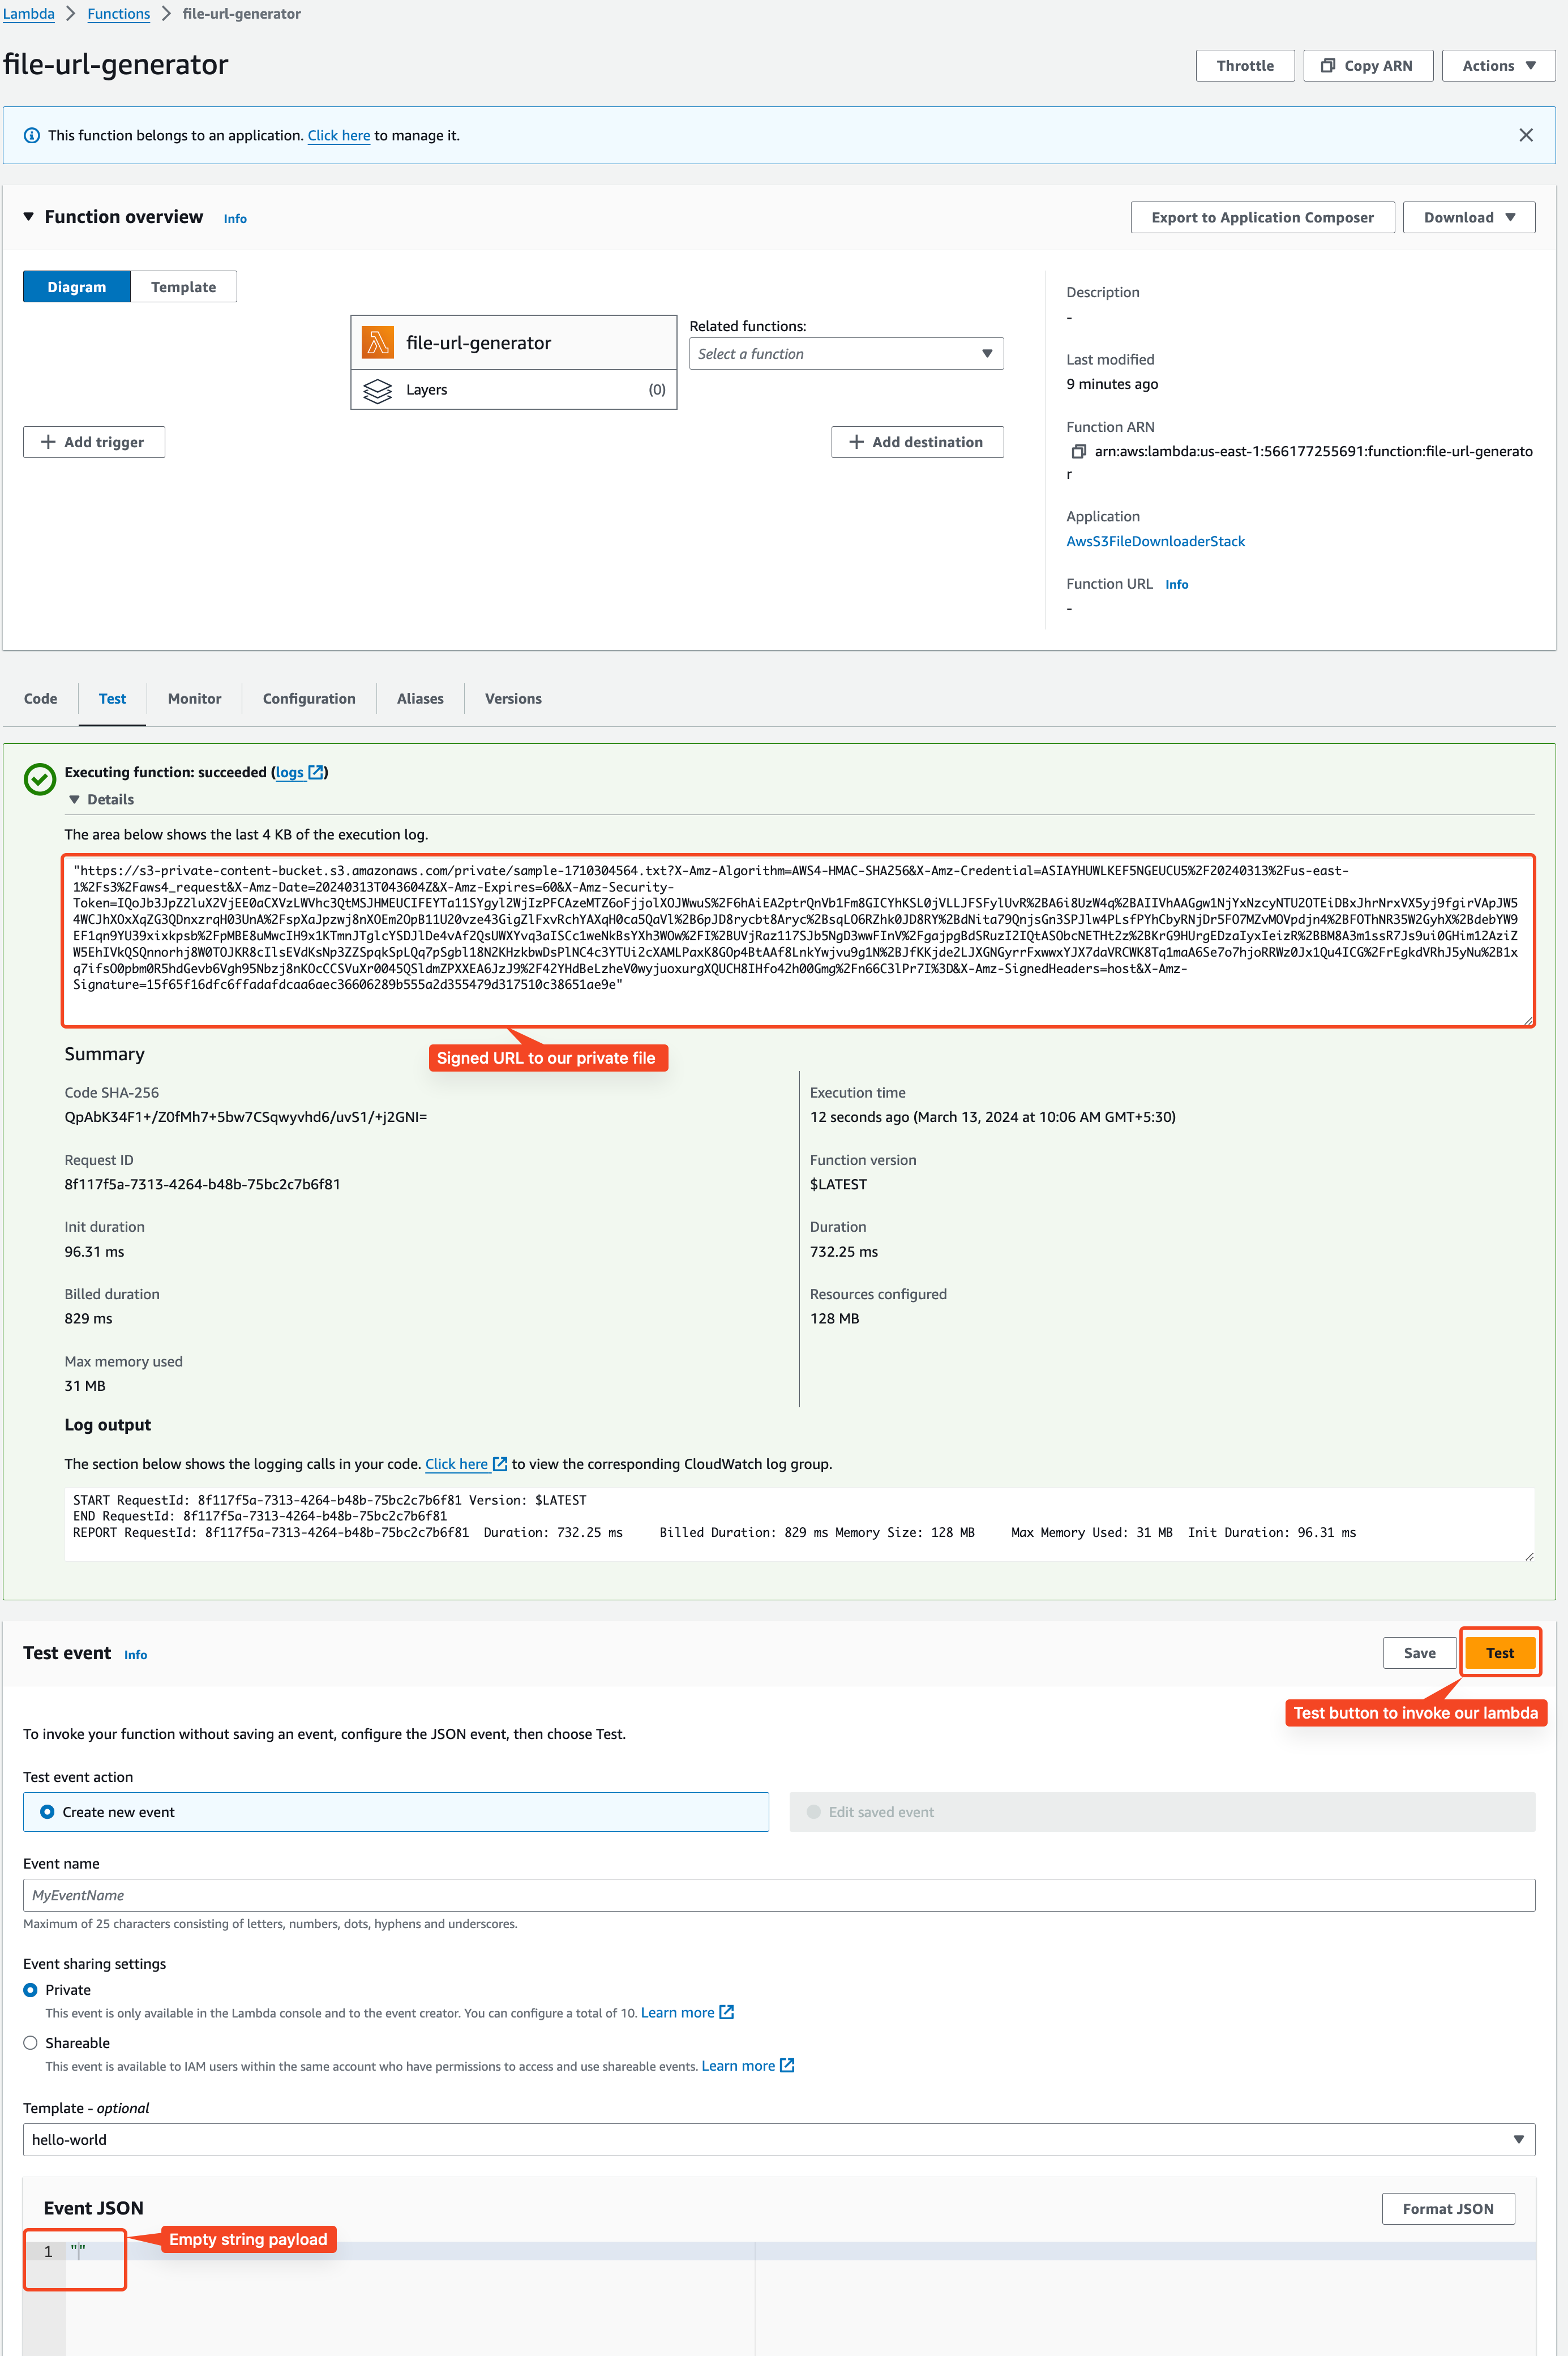
Run make deploy to begin the deployment, make sure your AWS CLI credentials are already configured. Once deployed, login to your AWS console, navigate to
the lambda function, update the test payload to an empty string "", and click on the test button to invoke the lambda function.

Conclusion
In this article, we learned how to configure lifecycle rules for automatic cleanup and configuring private paths in a public bucket with the help of a Go lambda function. As a side benefit we also learned how to use Makefile to ease our build process, and organise our project structure to make it more readable and maintainable.